
Key keywords: stainless steel rope mesh, rope mesh for animal enclosures, animal enclosure mesh, wall-mounted rope mesh, zoo mesh, flexible stainless steel cable mesh
The photograph above is a detail of a wall-fixed stainless steel rope mesh panel: thin cables crossing in a diamond lattice, every crossing locked by a small square ferrule, the whole sheet sitting flat against a rendered concrete wall. It looks effortless, which is exactly the trap. A panel only stays flat, tight and animal-proof when the wall fixing was designed before the mesh was ordered — and the fixing is the part most enclosure projects leave until the last week.
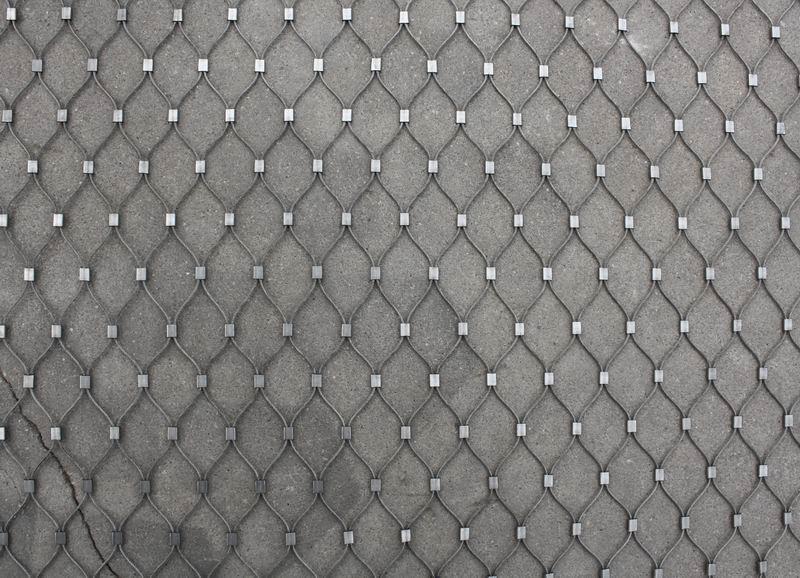
What you are looking at: the anatomy of a wall-mounted rope mesh panel
Four components do all the work in a stainless steel rope mesh panel. The cables carry the load and set the scale of the pattern. The ferrules lock each crossing so the diamond cannot slide out of shape when an animal pushes, climbs or hangs on it. The aperture — the size of the diamond opening — decides what can and cannot pass through. And the border is the load path: the edge cable is what transfers everything the mesh collects into the wall or frame.
The mesh in the photo is ferruled rather than sleeveless. You can read that from the small square fittings at each crossing. It is the right choice for a wall an animal will touch: a ferruled panel holds its geometry under repeated contact, inspection is a matter of looking at each fitting, and a damaged cable can be replaced without rebuilding the sheet. Sleeveless mesh is more transparent and softer to look at, and it has its place, but on a contact wall it tends to migrate.
The other thing the photo shows is how little of the view the mesh takes. From a metre away the wall behind it is still legible, yet the sheet is a continuous physical barrier across the whole elevation. That combination — a real barrier that reads as near-transparent — is the reason stainless steel rope mesh has displaced welded mesh and glass in so many animal enclosure walls.
Why animal enclosures use rope mesh instead of welded mesh or glass
Walk around a modern zoo, sanctuary or breeding facility and the wall material repeats: flexible stainless cable mesh. Six reasons come up again and again.
- It is close to invisible. Thin cables and a large open area mean visitors see the animal, not the barrier, and animals under pressure do not read a solid wall in front of them.
- It gives instead of cutting. Welded mesh has rigid edges and a hard surface; a falling or charging animal can be injured on it. A tensioned rope panel deflects, absorbs the impact and returns, which is why it is used for primates, big cats and bears.
- It survives washing and waste. Stainless cable does not rot, flake or hold moisture the way coated chain-link does, and it tolerates the disinfectants used in keeper corridors and quarantine rooms.
- It keeps light and air moving. Glass turns a south-facing den into a greenhouse. Rope mesh admits daylight and ventilation, which matters for indoor reptile and small-mammal rooms where humidity is managed.
- It spans without clutter. Because the load travels through the cable, panels can run between widely spaced posts, so the wall needs fewer mullions and fewer places for an animal to find a foothold.
- It repairs in place. One kinked cable is one cable, not a new panel. On a high-traffic enclosure that is the difference between a ten-minute fix and a shutdown.
The six numbers that define an animal enclosure panel
Every rope mesh panel is fully described by six figures. Get them onto the drawing and the quotation, the manufacture and the installation all fall into line.
| Parameter | Typical range | What it controls |
|---|---|---|
| Cable diameter | 1.5 mm to 4.0 mm; 2.0 mm and 3.0 mm are the common sizes | Strength, impact resistance and how visible the barrier reads |
| Aperture (diamond opening) | 20 mm to 100 mm | Escape risk, paw and limb reach, and the visual scale of the pattern |
| Steel grade | AISI 304 or AISI 316 | Corrosion life against humidity, salt and cleaning chemicals |
| Crossing type | Ferruled, or sleeveless (interwoven) | Rigidity on contact versus maximum transparency |
| Panel size | Made to your opening | Number of joints, handling on site and the border layout |
| Finish | Mill finish, black or colour coated | Glare, contrast against the wall and the look of the elevation |
Two of those rows are commonly guessed and then revised. The aperture should be sized to the smallest animal that will ever be in the enclosure, not the largest one on the day of the order — juveniles, and offspring born after handover, are the escape risk. And the grade is decided by the cleaning regime as much as by the climate: a reptile room washed down with chlorinated disinfectant needs 316 even if the building is a thousand kilometres from the sea.
Matching aperture and cable to the animal
The table below is a starting point drawn from enclosure practice, not a substitute for your zoo’s welfare rules or the structural engineer’s loading. Use it to sketch the specification, then confirm it against the species, the life stage and the fixing detail.
| Animal group | Starting aperture | Starting cable | What decides it |
|---|---|---|---|
| Marmosets, tamarins and small primates | 20–30 mm | 1.5–2.0 mm | Smallest juvenile; fingers and head entrapment |
| Macaques, baboons, capuchins | 30–50 mm | 2.5–3.0 mm | Grip strength and persistent pulling at ferrules |
| Big cats | 50–75 mm | 3.0–4.0 mm | Paw reach through the mesh, impact at a charge |
| Bears and large hoofstock | 75–100 mm | 4.0 mm | Body mass impact rather than escape size |
| Aviary and bird flights | 20–40 mm | 1.5–2.0 mm | Head and feather entrapment; smooth ferrule edges |
| Reptile and amphibian rooms | 25–50 mm | 2.0 mm | Humidity and chemical cleaning — specify 316 |
One pattern holds across the list: the smaller the animal, the smaller the aperture and the finer the cable. Widening the aperture to save cost is a false economy, because the panel then has to be replaced when the first juvenile arrives. If you are still weighing up materials and mesh construction, our complete guide to zoo mesh specifications walks through the same variables in more depth.
The wall fixing: five details that fail first
The mesh in the photograph is not hanging from a separate frame. It is held flat and tight against a solid wall, which is the hardest version of the detail to get right — the wall gives you nothing to work with, and everything has to come out of the anchoring and the border. These are the five failures worth designing out.
1. Anchoring into the render instead of the substrate
On a rendered or plastered wall the visible surface has almost no pull-out strength. Fixings must reach the concrete, blockwork or structural backing behind it. If the building is insulated or dry-lined, the mesh needs a carrier frame that is fixed through to structure, because a panel under tension will simply pull the cladding off the wall.
2. No stand-off, and nowhere for the debris to go
Mesh laid dead flat on a wall traps hair, bedding, food and dust in the space behind it, and that is the beginning of corrosion and smell. A stand-off of 30–50 mm — enough to brush behind and to let the wall dry — costs very little at the design stage and saves the whole panel later. It also stops an animal’s claws from being able to work between mesh and wall.
3. A border that was treated as trim instead of structure
The edge cable of a panel takes all the tension, so it is normally a heavier cable than the body of the mesh, clamped at close centres along the perimeter and turned into the anchors. Where a panel is simply cut and bolted at the corners, the diamonds at the edge distort the moment the mesh is tensioned — and a distorted edge is a gap.
4. Corners, returns and the gap nobody measures
Animals find the joint before they find the mesh. Internal corners need a continuous return rather than two panels butted together, and the junction at floor and ceiling needs a deliberate detail — a kerb, a capping angle or a return into the structure — so there is no finger-width slot along the bottom edge. Measure those gaps in millimetres, not by eye.
5. Tensioning done after the frame is closed
Tensioning has to be possible from the accessible side: turnbuckles, threaded terminals or tension plates that can be reached once the panel is in place. A panel that cannot be re-tensioned cannot be maintained, and the usual result is a sagging wall that has to be taken down. The general sequence is set out in our notes on metal mesh installation details, and the same logic applies to rope panels.
Ferruled or sleeveless for a wall panel?
This is the choice with the biggest effect on how the wall behaves, and it is usually settled by one question: will the animal touch it?
- Ferruled (as in the photo): a crimped fitting at every crossing. The lattice holds its shape, tension is easier to control, each crossing can be inspected on a walk-round, and a single cable can be re-strung. Slightly more visible up close, and slightly less flexible to roll and handle.
- Sleeveless (often called Webnet): the cables are interwoven so the crossings hold without fittings. Maximum transparency and a softer, more even pattern — but the crossings can shift under a climbing animal, and re-tensioning a local area is more awkward.
For a contact wall — primates, cats, bears, anything that will climb or hang — ferruled is the safer specification. For a visual backdrop in front of a solid wall, or an aviary where the mesh is mostly looked through, sleeveless reads better. Both are made to the same panel sizes, so the decision does not change the drawing.
Cleaning, disinfection and the 304 / 316 decision
Stainless steel is not equally stainless everywhere. AISI 304 is the sensible default for inland, indoor enclosures with routine cleaning. AISI 316, which carries molybdenum, is the grade to specify wherever chlorides are present: coastal and marine parks, pool and seal enclosures, reptile and amphibian rooms disinfected with chlorine-based products, and any wall washed down with harsh chemicals.
Two habits extend the life of either grade. Rinse after disinfection rather than letting the chemical dry on the cable, and avoid leaving steel wool or carbon-steel tools against the mesh, because free iron is what starts the tea-staining that gets blamed on the material. If the wall will see daily washdown, say so when you specify and choose 316 from the start — upgrading later means replacing panels.
The inspection routine that keeps a panel compliant
A rope mesh wall is low-maintenance, not no-maintenance. A short, repeatable walk-round satisfies most zoo and sanctuary inspection regimes and catches problems while they are still cheap.
- Monthly: look along the panel for ferrules that have slipped or rotated, broken strands, kinks and local slack. Check the floor and ceiling gaps with a gauge.
- Quarterly: check the anchors and the border clamps for movement, and press the centre of each panel to confirm it still has tension. Re-tension where the frame allows.
- After any escape attempt or heavy impact: inspect the whole run, not just the damaged bay — load redistributes through the border and the anchors.
- Annually: record the tension and the condition of the fixings so the next inspection has a baseline to compare against.
Five specification mistakes to avoid
- Sizing the aperture to the adult animal, then discovering the juvenile problem after opening.
- Fixing through render, plaster or cladding without a carrier frame back to structure.
- Leaving no stand-off, so debris collects behind the mesh from day one.
- Specifying 304 for a washdown or coastal wall because the price difference looked significant against a two-millimetre cable.
- Forgetting the keeper door, the feed hatch and the transfer gate until the mesh is on site — every one of them is a frame within the wall panel.
How Gecho supplies rope mesh for animal enclosures
We make flexible stainless steel rope mesh to panel size rather than cutting it from stock, in AISI 304 and 316, ferruled or sleeveless, with 7×7 and 7×19 cable construction. Panels are supplied to your opening dimensions with the border and fixing detail agreed first, and setting-out information goes with the order so the anchors can be positioned before the mesh arrives.
Minimum order is 10 m², with a one-week lead time on stock specifications; non-standard apertures, coatings and hardware are quoted on the drawing. Samples of the cable and ferrule can be sent before production so the pattern and the finish can be checked against the wall. For the wider context on animal fence and aviary work, our guide to animal fence rope mesh covers the perimeter and free-standing versions, and choosing a cable mesh specification sets out how the numbers interact.
Frequently asked questions
What mesh size do I need for an animal enclosure?
Start from the smallest animal that will ever be inside. Small primates and birds usually need a 20–30 mm aperture, macaques and similar primates 30–50 mm, big cats 50–75 mm, and bears or large hoofstock 75–100 mm. Cable diameter rises with body mass: 1.5–2.0 mm for small species, 2.5–3.0 mm for medium primates, 3.0–4.0 mm for large carnivores. Confirm the final figures against your welfare rules and the structural loading.
Is stainless steel rope mesh strong enough for large animals?
Yes, when the cable, the aperture, the border and the anchors are designed together for the species. Strength on a rope mesh wall does not come from the mesh alone: it comes from a tensioned panel transferring load through the border into fixings that reach structure. Tell us the species and the span and we will confirm the cable diameter and the fixing arrangement rather than leaving it to a rule of thumb.
Can rope mesh be fixed directly to a concrete wall?
Yes — that is exactly the detail in the photograph. The requirements are anchors that reach sound concrete rather than the render, a border cable that distributes the load along the perimeter, and a small stand-off so the wall behind can be cleaned and dried. On dry-lined or insulated walls, use a carrier frame fixed back to structure.
Will the mesh rust in a humid reptile room?
Not if the grade is right. AISI 304 is fine for ordinary indoor humidity, but reptile and amphibian rooms combine high moisture with chlorinated disinfectants, and that combination calls for AISI 316. Rinsing the mesh after disinfection and avoiding carbon-steel contact removes the other common cause of staining.
How do I stop animals pulling at the ferrules?
You reduce the opportunity: a smaller aperture keeps fingers and teeth away from the crossings, a properly tensioned panel gives nothing to work loose, and a stand-off prevents claws from getting behind the mesh. Ferruled construction also means that if one crossing is ever damaged, that cable can be replaced without removing the panel.
What is the minimum order and lead time?
The minimum order is 10 m², and stock specifications run on a one-week lead time. Panels with a non-standard aperture, a coloured finish or purpose-made hardware are quoted against your drawing, with the lead time confirmed at quotation.
Send us the wall, the species and the frame
If you are specifying a stainless steel rope mesh wall for an animal enclosure, the fastest way to a firm answer is a sketch: the elevation, the substrate, the species and life stage, and where the doors and hatches fall. Send those to our team through the contact page and we will come back with the aperture, cable grade, ferrule type and fixing layout for your wall — plus a sample of the mesh if you want to hold it against the render before you commit.